最終更新:2017/01/13
WordPressの子テーマは親テーマのコードを直接変更することなくコードを差し替えたり追加したりできるため、各自の好みや目的に応じたカスタマイズがしやすいという特徴がある。
仮に手に負えなくなったとしても、子テーマを丸ごとサーバーから削除してしまえば元に戻せるため、初心者でも挑戦しやすい。もちろん、プログラミングの一種であることに変わりはないため、子テーマをカスタマイズしたことによって発生した事態には当方は一切責任を負えない。
テーマを構成するコードのほとんどはPHPというスクリプト言語で記述されている。一般的なHTMLの途中にPHPスクリプトをタグのような形式で挟んでいくような記述スタイルを採用しているので、HTMLさえ理解していれば比較的取っつきやすい。
一方、WEBデザインで頻繁に使われるものでも、JavaScriptはスクリプトのほうが優位で、HTMLタグはあくまでもJavaScriptから出力される文字列という扱いになるため、HTMLの階層構造がわかりやすくなるようにインデントしながら記述するのは難しいという特徴がある。できないわけではないけど、JavaScriptの構文上のネストなのかHTMLを見やすくするためのネストなのか判別しづらくなるためJavaScriptの都合に合わせるのが一般的で、スクリプト内のHTMLはキリのいいところまでひたすら1行で書くというのもそれほど珍しい話ではない。見た目にもまさにプログラムコードといった趣で、動的HTMLを実現する方法がJavaScriptくらいしかなかった時代にはオブジェクト指向言語にも通じる記述方法も相まって決して初心者向きとは言えなかった。
また、JavaScriptはウェブ・ブラウザのようなクライアント側で動作するものであるのに対し、PHPはサーバー側が適切なバージョンのライブラリを実装していないと動作しないという性質のあるものなので、一般的な環境のローカルPCでは試験できない。手直ししたコードをサーバーに逐一アップロードしなければならないため動作確認に若干時間がかかり、それなりに根気が必要になるという点は覚えておいたほうがいい。
当ブログのデザインはWordPress標準のTwenty Fifteenテーマをベースにした子テーマを使用しているけど、WordPressに実装されているテンプレート関連タグ(関数群)は共通なので、他のテーマでも作業そのものは大差ない。プログラムに詳しくなくても親テーマのコードを参考にして見よう見まねで組んでもなんとかなる。
テンプレートの追加
親テーマの固定ページ用テンプレート・ファイルpage.phpを複製し、追加テンプレート用のファイルを用意する。テンプレートは固定ページにしか使えないものなので自明ではあるんだけど、念のため「page」という単語をファイル名のどこかに入れておいたほうが後々改良を加えたくなった時にどこを変更すればいいのか思い出しやすくなる。
page.phpの記述は次のようになっている。ヘッダーと記事ループとフッターが記述されているだけのシンプルなもので、ここで悩むようなことはないだろう。24行目でcontent-page.phpというテンプレートファイルを読み込んでいる。
<?php
/**
 * The template for displaying pages
 *
 * This is the template that displays all pages by default.
 * Please note that this is the WordPress construct of pages and that
 * other "pages" on your WordPress site will use a different template.
 *
 * @package WordPress
 * @subpackage Twenty_Fifteen
 * @since Twenty Fifteen 1.0
 */

get_header(); ?>

	<div id="primary" class="content-area">
		<main id="main" class="site-main" role="main">

		<?php
		// Start the loop.
		while ( have_posts() ) : the_post();

			// Include the page content template.
			get_template_part( 'content', 'page' );

			// If comments are open or we have at least one comment, load up the comment template.
			if ( comments_open() || get_comments_number() ) :
				comments_template();
			endif;

		// End the loop.
		endwhile;
		?>

		</main><!-- .site-main -->
	</div><!-- .content-area -->

<?php get_footer(); ?>
新テンプレート用のファイル名の長さには特に制限はないけど、あまり長くてもメリットはないので、vfpage.phpとした。WordPressテーマの決まり事として、最初のコメント行にテンプレート名を必ず書いておく。WordPressはここに書いたテンプレート名を識別して編集画面に反映する仕様になっている。
<?php
/*
Template Name: VANGUARD FLIGHT
*/

get_header(); ?>

	<div id="primary" class="content-area">
		<main id="main" class="site-main" role="main">

		<?php
		// Start the loop.
		while ( have_posts() ) : the_post();

			// Include the page content template.
			get_template_part( 'content', 'vfpage' );

			// If comments are open or we have at least one comment, load up the comment template.
			if ( comments_open() || get_comments_number() ) :
				comments_template();
			endif;

		// End the loop.
		endwhile;
		?>

		</main><!-- .site-main -->
	</div><!-- .content-area -->

<?php get_footer(); ?>
16行目をget_template_part( 'content', 'vfpage' );に書き換え、content-vfpage.phpを呼び出すように変更しておく。表示させたい内容に変更がない場合は書き換えなくても問題はないだろうけど、テンプレートを分岐させておきながら、結局親テーマのテンプレートを再度呼び出すようなプログラミングは後で混乱の元になるため、内容はまったく同じでもcontent-page.phpを複製してcontent-vfpage.php作成しておく。
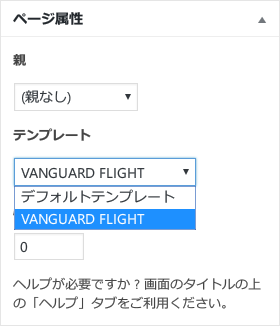
ここまで作成すると、固定ページ編集画面の「ページ属性」ボックスに追加したテンプレート名が追加される。

テンプレートを切り替えると、WordPressによって生成されたHTMLのbodyタグに「page-template-vfpage」といった、デフォルトとは異なるテンプレートを使用しているということを示すクラスが自動的に追加されるので、子テーマのstyle.cssに必要なスタイルを書き加える。
.page-template-vfpage h1,
.page-template-vfpage h2,
.page-template-vfpage h3,
.page-template-vfpage h4,
.page-template-vfpage h5,
.page-template-vfpage h6 {
	clear: none;
}

.page-template-vfpage table.infobox {
	table-layout: auto;
	float: right;
	width: 360px;
	margin: 0.5em 0 0.5em 1em;
}
Twenty Fifteenのデフォルトではレベルを問わず見出し行が来ると、CSSのfloatプロパティの左寄せ、右寄せが強制的に解除(clear: both;)されるようになっていたので、見出しが来ても右寄せ、左寄せを解除しないように変更した。また、infoboxというクラスを持つtableタグのスタイルを定義した。クラスを限定してあるので投稿フォーマットのブログ記事のスタイルにはまったく影響しない。
もちろん、新テンプレート専用のCSSファイルを別に用意してlinkタグで個別に読み込ませることもできるけど、テンプレート用のクラスをWordPressが追加してくれていることで煩雑な条件判定は既に済んでいると見なせるので、コード記述やファイル管理の手間が増える割にはメリットは少ない。
サイドバーの増設
Twenty Fifteenは片側のみ(デフォルトは左)のサイドバーしか想定していないので、親テーマのfunctions.phpには次に示すコードのように「sidebar-1」という名前のサイドバーがひとつしか登録されていない。有料テーマなど凝ったものでは複数のサイドバーがあらかじめ用意されているものもあるようだけど、WordPressが標準で用意してくれているテーマはいわば白地図のようなもので、各自のカスタマイズが前提みたいなところもあるので、あまり期待はしないほうがいい。
/**
 * Register widget area.
 *
 * @since Twenty Fifteen 1.0
 *
 * @link https://codex.wordpress.org/Function_Reference/register_sidebar
 */
function twentyfifteen_widgets_init() {
	register_sidebar( array(
		'name'          => __( 'Widget Area', 'twentyfifteen' ),
		'id'            => 'sidebar-1',
		'description'   => __( 'Add widgets here to appear in your sidebar.', 'twentyfifteen' ),
		'before_widget' => '<aside id="%1$s" class="widget %2$s">',
		'after_widget'  => '</aside>',
		'before_title'  => '<h2 class="widget-title">',
		'after_title'   => '</h2>',
	) );
}
add_action( 'widgets_init', 'twentyfifteen_widgets_init' );
サイドバーも「sidebar-vfpage.php」のようなテンプレート名を含むファイルを用意すれば、<?php get_sidebar('vfpage'); ?>といったコードでテンプレートによるデザインの切り替えも可能なんだけど、ダッシュボードの「外観」>「ウィジェット」からGUIを利用してウィジェットを編集可能なダイナミック・サイドバーを使えたほうが何かと都合が良い。
追加ダイナミック・サイドバーのために子テーマのfunctions.phpに次のようなコードを追加する。functions.phpがなく、style.cssだけでも子テーマとしては成立するし、特にエラーにもならないけど、ダッシュボードからコードを追加・編集することもできるようになるので、まったくの白紙状態でもいいからお約束としてfunctions.phpファイルは用意しておいたほうがいい。ただし、誤動作の元になるので親テーマのfunctions.phpを無闇に丸ごとコピーしてはいけない。
/* Add Extra Sidebar */
function vf_widgets_init() {
	register_sidebar( array(
		'name'          => __( 'VF用ウィジェット エリア', 'VANGUARD FLIGHT' ),
		'id'            => 'sidebar-2',
		'description'   => __( 'VF用サイドバーに表示されるウィジェットを追加できます。', 'VANGUARD FLIGHT' ),
		'before_widget' => '<aside id="%1$s" class="widget %2$s">',
		'after_widget'  => '</aside>',
		'before_title'  => '<h2 class="widget-title">',
		'after_title'   => '</h2>',
	) );
}
add_action( 'widgets_init', 'vf_widgets_init' );
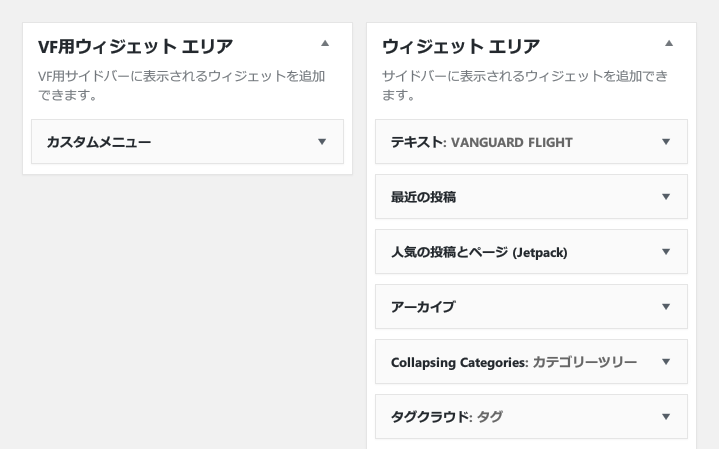
ダイナミック・サイドバー(ウィジェット・エリア)を追加すると、ウィジェット編集画面に次の画像のように2つのウィジェット・エリアが表示されるようになる。

コンテンツでサイドバーを切り替える
Twenty Fifteenテーマはヘッダーエリアとサイドバーエリアが左側のエリアを共有していて、上下に分け合って表示される仕組みになっているので、サイドバー本体はheader.phpから呼び出されるようになっている。ヘッダーエリアが独立していてタイトルとメインメニューの表示のみに使っているテーマの場合は、記事ループが記述されているテンプレートからフッターの直前にサイドバーを呼び出すようになっているものもある。
親テーマのsidebar.phpは次のコードのようになっている。サイドバーをひとつしか使わないことを前提としたコードなので、ブログの記事を表示していても、固定ページを表示していても同じサイドバーが表示される。
		<?php if ( is_active_sidebar( 'sidebar-1' ) ) : ?>
			<div id="widget-area" class="widget-area" role="complementary">
				<?php dynamic_sidebar( 'sidebar-1' ); ?>
			</div><!-- .widget-area -->
		<?php endif; ?>
そこで、子テーマにsidebar.phpを複製して作成し、特定のテンプレートを使用している場合のみ新しく登録したダイナミック・サイドバーを表示するように条件分岐を書き加える。is_page_template関数は特定のテンプレート・ファイルを経由して表示しようとしているかどうかを判定するため、テンプレート・ファイル名を引数として指定する。
		<?php if ( is_page_template( 'vfpage.php' ) ) :
			if ( is_active_sidebar( 'sidebar-2' ) ) : ?>
				<div id="widget-area" class="widget-area" role="complementary">
					<?php dynamic_sidebar( 'sidebar-2' ); ?>
				</div><!-- .widget-area -->
			<?php endif;
		else :
			if ( is_active_sidebar( 'sidebar-1' ) ) : ?>
				<div id="widget-area" class="widget-area" role="complementary">
					<?php dynamic_sidebar( 'sidebar-1' ); ?>
				</div><!-- .widget-area -->
			<?php endif;
		endif; ?>
なお、PHPは、主にHTMLと混在している箇所で条件分岐内等のブロックコードの始まりと終わりを意味する中括弧{…}は必須ではない、というプログラミング言語としては変わった仕様を持つ。ブロックの開始はコロン(:)で置き換え可能で、終始の記号が一対一で対応している必要も、何かの記号で閉じる必要も特にない。
記事のメタ情報の書式変更
投稿(post)フォーマットのコンテント・フッターには次の画像のようにメタ情報が表示される。ここに、最終更新日の情報を追加したい。

template-tags.phpに含まれる関数の移設
Twenty Fifteenテーマのコンテント・フッターは厳密にはテンプレートではなく、inc/template-tags.phpというファイルに記述された関数群で実現している。一度読み込まれると上書きを拒否するコードになっているため、他のテンプレート・ファイルと同様の感覚で子テーマにinc/template-tags.phpを追加して編集しても変更が反映されることはない。
まず、親テーマのtemplate-tags.phpの中からtwentyfifteen_entry_metaという関数を探す。
if ( ! function_exists( 'twentyfifteen_entry_meta' ) ) :
/**
 * Prints HTML with meta information for the categories, tags.
 *
 * @since Twenty Fifteen 1.0
 */
function twentyfifteen_entry_meta() {
:
:
(中略)
:
:
	}
}
endif;
template-tags.phpの代わりに、子テーマのfunctions.phpに同名の関数を追加、登録する。親テーマのtemplate-tags.phpよりも先に子テーマのfunctions.phpが実行されるため、こちらが優先される。
上のif ( ! function_exists( 'twentyfifteen_entry_meta' ) ) :~endif;というコードで、一度定義された関数は重複して定義しないようになっているので、親テーマの同名の関数で上書きされたり、二重定義でエラーになったりすることはない。
15~37行が投稿日と最終更新日に関するコード。詳しくは説明しないけど、ところどころ出てくるprintf関数やsprintf関数がJavaScript式のHTML挿入方法によく似ていて、HTMLタグでは普通使わない「%1」や「$s」が出てきてプログラム初心者には少し敷居が高そうに見えるかもしれない。関数そのものはC++の祖先のC言語時代からある「初心者がまず最初に覚える関数」のひとつではあるんだけど、本来は英語であるシステム・メッセージの多言語翻訳の都合もあり、WordPressでは使い方がやや高度。
function twentyfifteen_entry_meta() {
if ( is_sticky() && is_home() && ! is_paged() ) {
printf( '<span class="sticky-post">%s</span>', __( 'Featured', 'twentyfifteen' ) );
}
$format = get_post_format();
if ( current_theme_supports( 'post-formats', $format ) ) {
printf( '<span class="entry-format">%1$s<a href="%2$s">%3$s</a></span>',
sprintf( '<span class="screen-reader-text">%s </span>', _x( 'Format', 'Used before post format.', 'twentyfifteen' ) ),
esc_url( get_post_format_link( $format ) ),
get_post_format_string( $format )
);
}
if ( in_array( get_post_type(), array( 'post', 'attachment' ) ) ) {
$time_string = '<time class="entry-date published updated" datetime="%1$s">%2$s</time>';
$time_string = sprintf( $time_string,
esc_attr( get_the_date( 'c' ) ),
get_the_date(),
esc_attr( get_the_modified_date( 'c' ) ),
get_the_modified_date()
);
printf( '<span class="posted-on"><span class="screen-reader-text">%1$s </span><a href="%2$s" rel="bookmark">%3$s</a></span>',
_x( 'Posted on', 'Used before publish date.', 'twentyfifteen' ),
esc_url( get_permalink() ),
$time_string
);
if ( get_the_time( 'U' ) !== get_the_modified_time( 'U' ) ) {
printf( '<span class="updated-on"><time class="updated" datetime="%1$s">%2$s</time></span>',
esc_attr( get_the_modified_date( 'c' ) ),
get_the_modified_date()
);
}
}
if ( 'post' == get_post_type() ) {
if ( is_singular() || is_multi_author() ) {
printf( '<span class="byline"><span class="author vcard"><span class="screen-reader-text">%1$s </span><a class="url fn n" href="%2$s">%3$s</a></span></span>',
_x( 'Author', 'Used before post author name.', 'twentyfifteen' ),
esc_url( get_author_posts_url( get_the_author_meta( 'ID' ) ) ),
get_the_author()
);
}
$categories_list = get_the_category_list( _x( ', ', 'Used between list items, there is a space after the comma.', 'twentyfifteen' ) );
if ( $categories_list && twentyfifteen_categorized_blog() ) {
printf( '<span class="cat-links"><span class="screen-reader-text">%1$s </span>%2$s</span>',
_x( 'Categories', 'Used before category names.', 'twentyfifteen' ),
$categories_list
);
}
$tags_list = get_the_tag_list( '', _x( ', ', 'Used between list items, there is a space after the comma.', 'twentyfifteen' ) );
if ( $tags_list ) {
printf( '<span class="tags-links"><span class="screen-reader-text">%1$s </span>%2$s</span>',
_x( 'Tags', 'Used before tag names.', 'twentyfifteen' ),
$tags_list
);
}
}
if ( is_attachment() && wp_attachment_is_image() ) {
// Retrieve attachment metadata.
$metadata = wp_get_attachment_metadata();
printf( '<span class="full-size-link"><span class="screen-reader-text">%1$s </span><a href="%2$s">%3$s × %4$s</a></span>',
_x( 'Full size', 'Used before full size attachment link.', 'twentyfifteen' ),
esc_url( wp_get_attachment_url() ),
$metadata['width'],
$metadata['height']
);
}
if ( ! is_single() && ! post_password_required() && ( comments_open() || get_comments_number() ) ) {
echo '<span class="comments-link">';
/* translators: %s: post title */
comments_popup_link( sprintf( __( 'Leave a comment<span class="screen-reader-text"> on %s</span>', 'twentyfifteen' ), get_the_title() ) );
echo '</span>';
}
}
Genericonsの新規使用指定
Twenty FifteenはGenericonsを使用している。せっかくなので見栄えも揃えたい。上で改変したtwentyfifteen_entry_meta関数では更新日の表示にupdated-onクラスを新たに使用することにしているので、当該クラスをstyle.cssのGenericonsを使用するクラスに追加する。
.social-navigation a:before,
.secondary-toggle:before,
.dropdown-toggle:after,
.bypostauthor > article .fn:after,
.comment-reply-title small a:before,
.comment-navigation .nav-next a:after,
.comment-navigation .nav-previous a:before,
.posted-on:before,
.updated-on:before,
.byline:before,
.cat-links:before,
.tags-links:before,
.jetpack_views:before,
.comments-link:before,
.entry-format:before,
.edit-link:before,
.full-size-link:before,
.pagination .prev:before,
.pagination .next:before,
.image-navigation a:before,
.image-navigation a:after,
.format-link .entry-title a:after,
.entry-content .more-link:after,
.entry-summary .more-link:after,
.author-link:after {
	-moz-osx-font-smoothing: grayscale;
	-webkit-font-smoothing: antialiased;
	display: inline-block;
	font-family: "Genericons";
	font-size: 16px;
	font-style: normal;
	font-weight: normal;
	font-variant: normal;
	line-height: 1;
	speak: none;
	text-align: center;
	text-decoration: inherit;
	text-transform: none;
	vertical-align: top;
}
使いたいアイコンをウェブサイトのサンプルから選び、アイコン・コードをstyle.cssのGenericonsの各クラス定義部分に追加する。
.format-aside .entry-format:before {
	content: "\f101";
}

.format-image .entry-format:before {
	content: "\f473";
}

.format-gallery .entry-format:before {
	content: "\f103";
}

.format-video .entry-format:before {
	content: "\f104";
}

.format-status .entry-format:before {
	content: "\f105";
}

.format-quote .entry-format:before {
	content: "\f106";
}

.format-link .entry-format:before {
	content: "\f107";
}

.format-chat .entry-format:before {
	content: "\f108";
}

.format-audio .entry-format:before {
	content: "\f109";
}

.posted-on:before {
	content: "\f307";
}

.updated-on:before {
	content: '\f420';
}

.byline:before {
	content: "\f304";
}

.cat-links:before {
	content: "\f301";
}

.tags-links:before {
	content: "\f302";
}

.comments-link:before {
	content: "\f300";
}

.full-size-link:before {
	content: "\f402";
}

.edit-link:before {
	content: "\f411";
}
改修が終わったコンテント・フッター。矢印が円形につながっている更新マーク(正確にはリフレッシュ・アイコン)の後に最終更新日が表示されている。

参考記事
- WordPressでオリジナルデザインのホームページを作る方法(OXY NOTES)
- 固定ページのテンプレートにオリジナルを追加・作成する方法(PresentNote)
- 【WordPress】テーマの inc/template-tags.php 内関数を子テーマで使いたい(salmomoのさるもも)
- 無料で使えるフラットアイコンフォント「Genericons」(Web’Notes)
- WordPressでページやカテゴリごとにサイドバーを切り替えるには(西沢直木のIT講座)